©
Read here how to make your own balloon arch, the professional way.
by Marcel, 2019-06-05
Table of Contents
- Advantages of having a balloon arch delivered ready-made
- Disadvantages of having a balloon arch delivered ready-made
- How can I have a balloon arch delivered?
- How long does a balloon arch last?
- Make your own balloon arch
- What colors of balloons to use?
- Shopping list
- How long have you been busy
- Step-by-step plan
- Assemble a balloon arch
- Would you rather have a ready-made balloon arch delivered to your home?
Disclaimer: We receive a small commission from some of the links on this page.
A balloon arch is an arch of 11 inch balloons that is often placed in front of an entrance, where guests enter under. A balloon arch in front of the door is a striking eye-catcher and a warm welcome for your guests at a wedding, an opening or any other festive occasion.
There are 2 ways to get a balloon arch for your party or event. You can have a ready-made balloon arch at your home or company to deliver, but you can also choose to make the balloon arch yourself.
Advantages of having a balloon arch delivered ready-made
- The balloon arch is delivered to you ready-made, so you don't have to worry about it. You don't have to do anything about it yourself.
- The balloon arch looks professional. I.e. the balloons are all the same size and run in a spiral shape through the arch.
- The balloon arch will be placed on sturdy supports and will be properly secured so that it can remain stable outside.
Disadvantages of having a balloon arch delivered ready-made
- The price is higher than if you make the balloon arch yourself. Delivery costs are often charged.
- Someone usually has to be present to receive the balloon arch.
How can I have a balloon arch delivered?
We at Globos Balloons can take care of this for you. We work with a network of balloon companies throughout the country. That means that we always have a professional balloon decorator in your area, so you don't pay too much delivery costs. This is certain also attractive when you need balloon arches at multiple locations at the same time. We always supply spare balloons with our balloon decorations so that you can replace any punctured 11 inch balloons.
Would you like to have a ready-made balloon arch delivered, either to 1 location or to multiple locations? Please ask us for a quote without obligation. button below.
How long does a balloon arch last?
The shelf life of a balloon arch is between 1 and 5 days. A balloon arch that is placed outside against the entrance is easy to secure and is therefore much less vulnerable than a balloon arch that is free-standing. Therefore, always make sure that we can secure the balloon arch to something so that it cannot blow over in bad weather. If the balloon arch has to be placed indoors, you do not have to take this into account.
If you have a balloon arch delivered ready-made, we always supply spare balloons so that you can replace any punctured balloons and thus keep the balloon arch beautiful for even longer.
Make your own balloon arch
It is certainly possible to make a balloon arch yourself. This saves a lot of money and may still be fun to do, with the necessary satisfaction once it is up and running. A disadvantage is that making a balloon arch takes a lot of time and the balloon arch may not look as nice as if you had it delivered by a professional company. You should also ask yourself whether you should invest in an electric balloon pump or compressor. In any case, you will certainly have to fill more than 100 balloons.
Anyway, we previously wrote an article with a step-by-step plan on how to make a professional balloon arch yourself. You can find this article here. Good luck!
What colors of balloons to use?
If you want a balloon arch with a spiral shape, you can choose to have the arch made in 1, 2, 3 or 4 colors. Would you like more colors in the balloon arch? Then you could choose to incorporate all the desired colors anywhere in the balloon arch. Or you can make a balloon arch in layers instead of in a spiral. This way, each layer / cluster gets a different color balloon, such as a rainbow balloon arch where the first 6 layers are made of red balloons and then 6 layers of orange, yellow, light blue, etc...
If you want the traditional spiral shape in your balloon arch, you can experiment with colors via this link.
Below I will explain to you how to make a professional balloon arch in just a few steps. In exactly the same way as we know it Making Globos balloons. In the professional way i.e. a balloon arch that is symmetrical with a spiral that ends in a point in the center of the arch/doorway. So not one with a spiral that continues that it ALWAYS seems like thise is tilted. To this you can often tell whether the balloon arch was made by a CBA (Certified Balloon Artist) or by someone who got it wrong or even wrong learned.
Shopping list
Below is an overview of the materials you need for a balloon arch of 1 meter wide (for the door of a house). Nothing more and nothing less. You can simply get the top 4 items at the hardware store. And don't you know which tubes and socks I mean? Then take this list with you and show it to an employee. He knows exactly what you need and every hardware store has those tubes and socks lying around.
- 2 Parasol bases (as cheap as possible). We use professional supports, but for a do-it-yourselfer, 2 parasol feet are required easiest.
- 3 PVC electrical pipes 5/8 (16mm) of 2 meters long
- 2 PVC socks 5/8 (16mm) to connect the pipes together
- Duc tape (little bit)
- 120 balloons of 30 - 33 cm. Order them here!
- For every person you help 1 Balloon pump
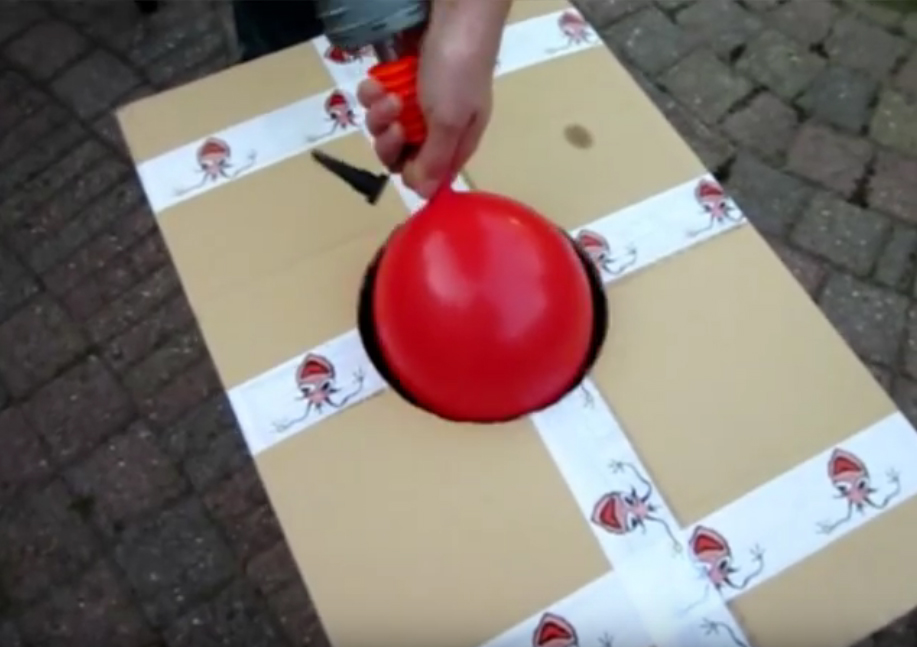
- 1 Cardboard box with a hole in it of 25cm∅ (make it yourself, see photo)
 p>
p>
How long have you been busy
That question has everything to do with the balloon pump you will use. The balloon pump I mentioned in the shopping list above is the cheapest and fastest hand pump. This pump fills the balloon with every pushing AND pulling movement. I can't look in your wallet but... try to pump as many people as possible who help you, because you will soon have to fill at least 120 balloons. Maybe you have one electric balloon pump or a compressor, that saves a lot of time. But never fill balloons with your mouth because if one blows in your face, that's when the fun ends get rid of it quickly.
I will not go into the use of an electric balloon pump because - if you wanted to purchase one - you could do better for the money. Have us deliver a ready-made professional balloon arch. We are ourselves less than 15 minutes, but we do have a professional pump that inflates the balloons very quickly and with exactly the same method. Anyway... For the sake of completeness, here's a link to a quick cheap electric balloon pump.
Step-by-step plan
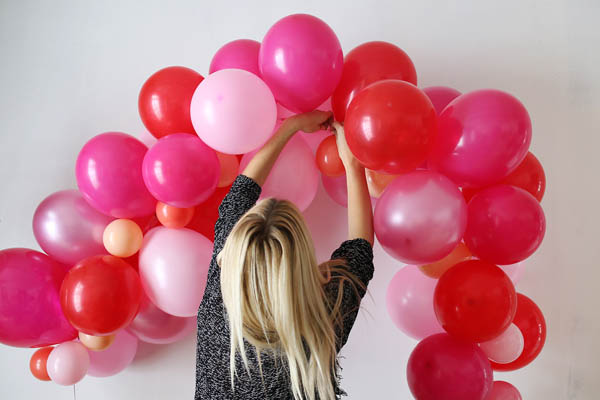
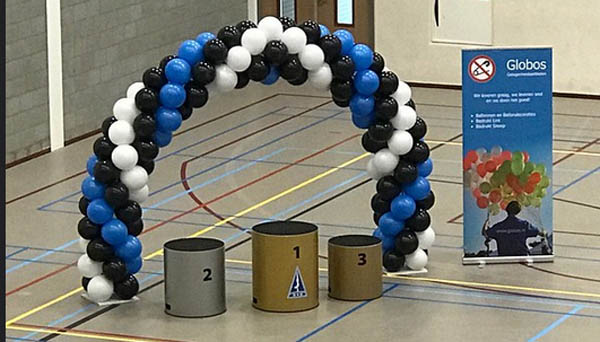
Okay, let's get started! For clarification and as an example, I will use a balloon arch in 2 colors such as the photo of the balloon arch at the top of this one page. For convenience, I call the 2 colors black and gold, but these can of course be any other colors you want.
- Fill a balloon with air so that it fits exactly through the hole in the box (see photo) and tie the balloon closed.
- Repeat this step for all 120 balloons (60 black and 60 gold balloons).
- Now make 60 sets of 2 by tying 2 balloons together with the knot (see illustration A).
- Now make 30 sets of 4 by twisting 2 sets around each other a few times at the button so that the 2 gold ones are next to each other and the 2 black (see illustration B).
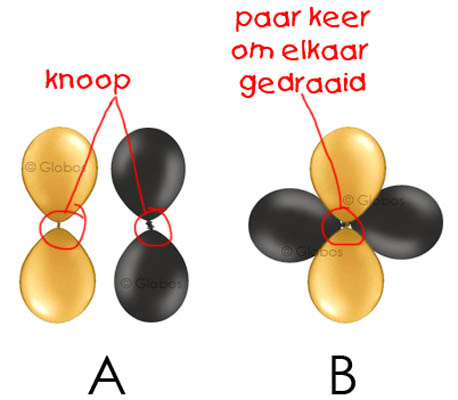
You So now you have 30
clusters of 4 balloons (2 gold and 2 black) as shown in illustration B.
- Now insert 1 PVC pipe into a parasol base.
- Take a cluster of balloons and slide them around the tube, as close to the parasol base as possible.
- Now twist the 2 balloons with the tube between them twice with the tube between them. The cluster is now attached to the tube and balloons of the same color sit opposite each other.
- Take another cluster and press it tightly onto the cluster you just placed. Rotate the entire cluster 45 degrees counterclockwise underlying cluster (see illustration C) and attach it to the tube again by twisting the 2 balloons between the tube.
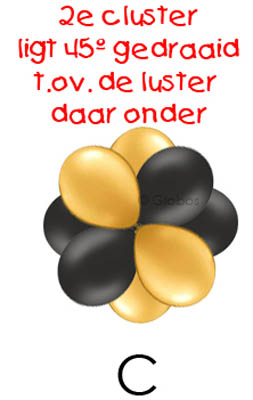
Your project is ready after 2
So far they have been laid out as shown in illustration C.
- Repeat this step until you have 12 clusters on 1 tube, the spiral turning counterclockwise.
- Now make the 2nd tube, but then place the clusters on the right side of the layer below.
- Saw, cut or cut and break the 3rd tube in half so that je have 2 pieces of one meter.
- Place the short tube in the parasol base and place 3 layers turning left and then 2 layers turning right. This will be the center of the balloon arch.
Make sure you have approximately 10cm of bare pipe on all sides of the 3 parts so that you have enough space to connect the pipes later. Is the tube too long or too short? Then fill with an extra cluster or saw off the tube or remove a cluster. In any case, make sure that both parts are long has the same number of clusters. The short part must have at least 1 more cluster that rotates to the left than those that rotate to the right. So 3 to the left and 2 to the right. Or 4 to the left and 3 to the right. Or if you want to make a balloon arch for a double door, it's 6 to the left and 5 to the right. It the middle section therefore always has an odd number of clusters!
Assemble a balloon arch
You have now done most of the work. You now have 3 parts: 2 sides and 1 middle piece.
- Place 1 parasol base on the left and 1 parasol base on the right of the door.
- Place the part whose spiral - seen from above - turns counterclockwise in the left parasol base and the part that turns clockwise in the right parasol base.
- Now slide both sockets (connectors) on top of both ends of the tube.
- Take the center piece and hold it in line with the left upright and make sure that the bottom part of the spiral also turns counterclockwise and slide it into the coupling piece. Make sure that the spiral of the left upright flows seamlessly into the 1st part of the middle piece.
- Now bend the (longer) left upright towards you so that you can reach the end and slide it into the socket of the right upright. Again, make sure that the spiral merges seamlessly into the right spiral.
If you now look from a distance, you will see that both spirals turn towards the doorway. Fine! Once you have turned them over, the spirals away from the doorway and then you better turn them around the balloon arch.
Example of a balloon arch with the spiral turning the wrong way (away from the doorway). Solution: just turn the bow around because it looks good from the other side ;-)
That's it! You have made your own balloon arch. Congratulations! Is it outside? Then just make a string in the middle of the arch or 2 on the sides and tie it somewhere to the door frame or to something that is available there. This way it stays in place even when the wind blows.
Would you rather have a ready-made balloon arch delivered to your home?
That is of course also possible. Gladly even! We deliver our balloon arches 24 hours a day, 7 days a week throughout the Netherlands to your home or work. Buy balloon arch
Tags
Click on a tag for an overview of articles with the same topic.
balloon arch
Comments 0